
.....
(Taken from page 19 of the USATF measuring manual)
Now imagine the typical case where a few thousand (or tens of thousands) of runners are running the course, where will you likely end up? Probably the red line instead. Weaving and swerving around runners.
.....

.....
(Professional MSPaint skillz on top of page 19 from the USATF manual)
So how much extra does this one measly turn add? Well…we’ll get there in a second. The next scenario to look at is the twisting road case.
.....

.....
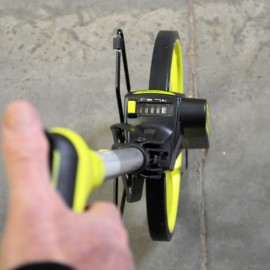
In this scenario, the official course cuts the corners. But in real life? You’re likely swaying through the full width of the road with a few thousand of your closest friends. Now, let’s see how this all adds up. We went out to my street and measured a simple turn – just like the first example above. First we measured the inside of the curve. There were actually two successes there – one in getting the measurement, and two in not getting hit by a car. That would have been a fail. (For the best Accuracy use a rolling measuring stick. These can be purchased via our online store.) And then we measured the outer edge of the curve. From there, these are what the numbers look like:
.....

.....
Yes, I’ll give you a moment to continue admiring my mad paint abilities. Ok. Moment over. Now you say – so what, that’s only 40 feet? Well, next we pull up the course diagram for the National Marathon. You can search all certified courses here. From that we can pull the official course map.
.....

.....
Of course, I could count all the turns. But I’m lazy. I happen to know that the National Marathon also listed them all out on their website to make things kinda simple. Each turn had someone there to help runners along. In total, there were 64 turns on this course. They add up pretty quickly, don’t they?
Now, my math only is for a simple kinda skinny two-lane road. In the case of National, it’s actually a four to six lane road in most cases, plus curbs, making for 2-3 times the lengths I discuss. But we’ll stick with my measurements for the point of this.
.
So, let’s take 40 feet and multiple it by 64 turns. That’s a total of 2,560 feet. Or .48 miles. Yes – almost HALF A MILE extra!
Oh, but here’s the best part, we haven’t even accounted for all the swerving you do. How many times did you hit up the water stop on the opposite side of the road because it seemed more interesting (yes, I have)? Or go around a pack of runners? Or just switch sides to give a bunch of kids high-fives? Yup, they all add up.
.
Imagine if you had that extra half a mile back? That’d be probably 5+ minutes for most runners on a marathon. A fair bit, right?
Finally, there’s actually one additional explanation. Different software programs use different algorithms to determine how far you ran between GPS track points. Your GPS file is actually a bunch of ‘track points’ – like a breadcrumb trail. And software (either on the device itself, or your desktop) interpolates all that and determines how far you ran. Some software is smarter than others, and can remove erroneous data points (for example, going into a tunnel you occasionally get incorrect data points on the exit from the tunnel). So I often see cases where my Garmin on the watch will say one thing, and on Sports Tracks it will say something else. Generally Sports Tracks is smarter though… Obviously if you have a foot-pod based system (i.e. many Polars), then the GPS variance won’t apply – but running the wrong line still does.
.
So, the point being if you’re off by a little bit, it’s probably not because the course is mis-measured, it’s more than likely you simply ran a little bit extra.
.
How we do what we do:
The first step in what we do is to map the course on MapMyRun.com. This way, we can see what the course is supposed to look like, and see if it may be the correct length. BUT, before we can decide if it is close to the correct length, we zoom-in on the course, and turn on the Satellite View. We can then see if it was mapped following the Shortest Possible Route (SPR). If not, we edit the path of the course, to follow the SPR. We also ask about lane restrictions, as we need to measure following the SPR that the runners will be allowed to run on race day.
Once the proper course has been established, we then see if we need a spur to adjust the length, or if the Start or Finish can float, to allow for proper course length. MapMyRun is not accurate to the precision of proper measurement, so we need about a 100 yard window for where the Start or Finish may land, if we don’t have an adjustment spur.
.
Once established, we download a GPS track of the course onto our tracking device. This way, we are not looking at maps while trying to ride the SPR. Much better way to make our way around the course!
.
We then head to the course to be measured. We turn on the GPS tracker, and locate our measurement starting point (either Start, or Finish, or at the start or end point of the adjustment spur). We mark the location with a route flag or piece of duct tape (sometimes we use sidewalk chalk). We then walk the route, marking our splits as we go (unless we started at the beginning/end of the spur). We walk until we get the total distance for the course, and see where that is. If it is in an acceptable location (close to where we wanted it), great!. We put another piece of duct tape down, and turn around. We then ride the opposite direction, noting our KM/Miles as we go. When we get back to where we began (the piece of duct tape), we note our distance. If we have not measured enough distance for the entire course, we note our click-count, then continue to walk until we reach the correct number of clicks (Distance). If we stop short of our mark, we note the clicks needed to reach our mark.
.
Flags are placed at each km and mile location. We also mark the indicator (Start, 1 mile, etc.). We take a picture of each mark, showing enough background so someone can tell they are in the correct location. We also mark a GPS waypoint. We do this for each location.
.
We then return to the course, and repeat the process for accuracy. Once complete (assuming the 2nd measurement matches the first),we go home to make the map. If, on the other hand our measurements are off, we may need to go out and move the Start, Finish, or Turnaround point, depending on what can move. We hope this doesn’t happen, but it sometimes will. Now at home, we complete the paperwork.
While we use Adobe Illustrator, Photoshop, and Adobe Acrobat Standard v9, we also advocate the use of OpenOffice. OpenOffice is FREE, and has layering, similar to Illustrator. We use Photoshop to do screen-capture cropping, but you can get ScreenHunter FREE, and it captures just as well.
In making maps, one of the most important factors is the order of layers. We capture the MapMyRun satellite image, keep it proportional while we scale it to fit properly on the sheet (3/8″ open borders on all sides of the page). Then, we zoom-in on smaller areas of the image on MapMyRun, so we can see more detail. Capture those enhanced images, and place them on the main satellite image (on a separate layer). After that, we put black road lines on a layer, then copy the black lines, paste them onto a higher layer, turn them white, then reduce the stroke of the white lines, by one point. This creates nice roads.
.
Then we put on the course lines and arrows, showing the use of the roads (curb-to-curb, restricted to a lane, or so-forth). After course arrows, we put the descriptions of each KM/Mile, and include GPS coordinates for each point. These coordinates are not for replacing lost marks, but to allow the user to get real close to our marks, so it is easier to find them. If you are standing at one of the coordinates, you should be able to see the light post, or address, or whatever we used to reference the location.
.
Finally, we put the name of the race, the city and state, and the certification information in the (normally) upper-right corner of the map. We colorize many elements of our maps, though, to post on our Website, and to send to our clients. This makes it much easier to read the maps, and to see the different elements. Color enhances user experience!
.
That, in a nutshell, is our process. If you want us to do the maps for you (if you measured the course yourself, but don’t want to mess with the map), we can do that. Fee applies.
.
.